The core is a crucial component of your body and is often what supports us throughout our day. We depend on our core to support us, move and balance. It also helps us maintain our stability.
When we strengthen our core, we will reduce the risk of injuries, boost energy levels, and improve posture. This article explores 15 core yoga poses that strengthen your core, so you can determine the best ones to try to build up the core!
The Benefits of Yoga’s Core Poses
There are many benefits associated with Yoga’s fundamental poses. These benefits include:
1.) Strengthening of your core muscle.
2.) stability and balance improved.
3.) Improved flexibility.
4) Greater mobility.
5) Improved circulation and breathing.
6) Relieve tension and Stress.
7) better posture.

15 Yoga Poses for Core Building
The poses listed below are an excellent place to begin starting with Yoga. They’ll help build strength and flexibility, and awareness of your body.
1. Camel Pose
Camel pose is an excellent technique to strengthen your core strength. Start by laying on your knees and hands while in the camel posture. After that, repeat the exercise by placing your hands on your lower back and with your back arched. Your back and abs should be stretched. Keep this posture for 30 to one minute.
Camel poses are a fantastic means to stretch and build your core muscles. It aids in improving flexibility in your spine and strengthens your abs, back, and hips. Camel poses can also assist in alleviating discomfort in the neck and lower back.
Benefits of Camel Pose
- Reduces the amount of fat on the thighs.
- The hips are flexed, and the hips open. Them to stretch those hip muscles.
- Stretches and strengthens the shoulders and back
- It increases the abdominal region to enhance digestion and elimination
- Improves posture
- The chest is widened, thus allowing for better breathing.
- The vertebrae are loosening up
- Lower back pain is less painful.
How To Practice
1. Keep your knees on the ground while keeping your spine straight. Keep your legs hip-width apart.
2. Place your hands on your pelvis’ rear while your thumbs rest on your sacrum.
3. Your thighs should be turned to the side, and then place your hips right over your knees.
4. Inhale, then lean back and then stretch your ribcage.
5. Keep your chest up by keeping your core engaged by keeping your chin straight while reaching behind using your hands to grab the heels.
6. Look up towards the light.
7. To release from the posture, extend your hands to your hips. Then, gradually rise to a standing pose.
8. Try this for a minimum of 30 seconds.
2. Bow Pose
Bow Pose is an excellent yoga posture for strengthening your abs and strengthening core muscles. For this yoga posture, start by lying on your back on your mat. Then, extend your arms back and grasp your ankles. Then slowly lift your torso and head above the ground, then bring your legs up towards your body. Do this for a few minutes before releasing your body and returning to the beginning posture.
This pose is great for strengthening the muscles in the shoulders, back, and arms and opening the chest and the lungs. Place a towel or strap around your ankles rather than your ankles to modify this posture if you’re not familiar with Yoga.
Benefits
- The muscles that surround the Spinal Cord and the Neck are strengthened. The alignment of the spine is improved.
- The chest and shoulder muscles are working in a way that builds them up, as well as eliminating any shoulder sagging.
- The muscles surrounding the calves, the hamstrings, and the legs get stretched out, strengthening them and enhancing the. Thus, this practice is beneficial for athletes.
- It offers a lot of flexibility for the back.
How To Practice
- Place your body lying on your mat. You could place an extra mat on top of your pelvis if you need it. Set all of your feet on the ground. After that, bend your knees to the side while ensuring that your toes are in motion.
- Begin by grabbing your ankles’ sides using your hands. then bend your ankles vigorously.
- Inhale and bring your shoulders and ribs toward your ears. After exhaling, extend your tailbone. Then, bring your legs back to your hands as you hold your rib cage.
- From here, lift your head, and then open your heart. Focus your eyes on the sky. Pull your thighs back to lift your chest.
- Keep your lift going for 5 minutes.
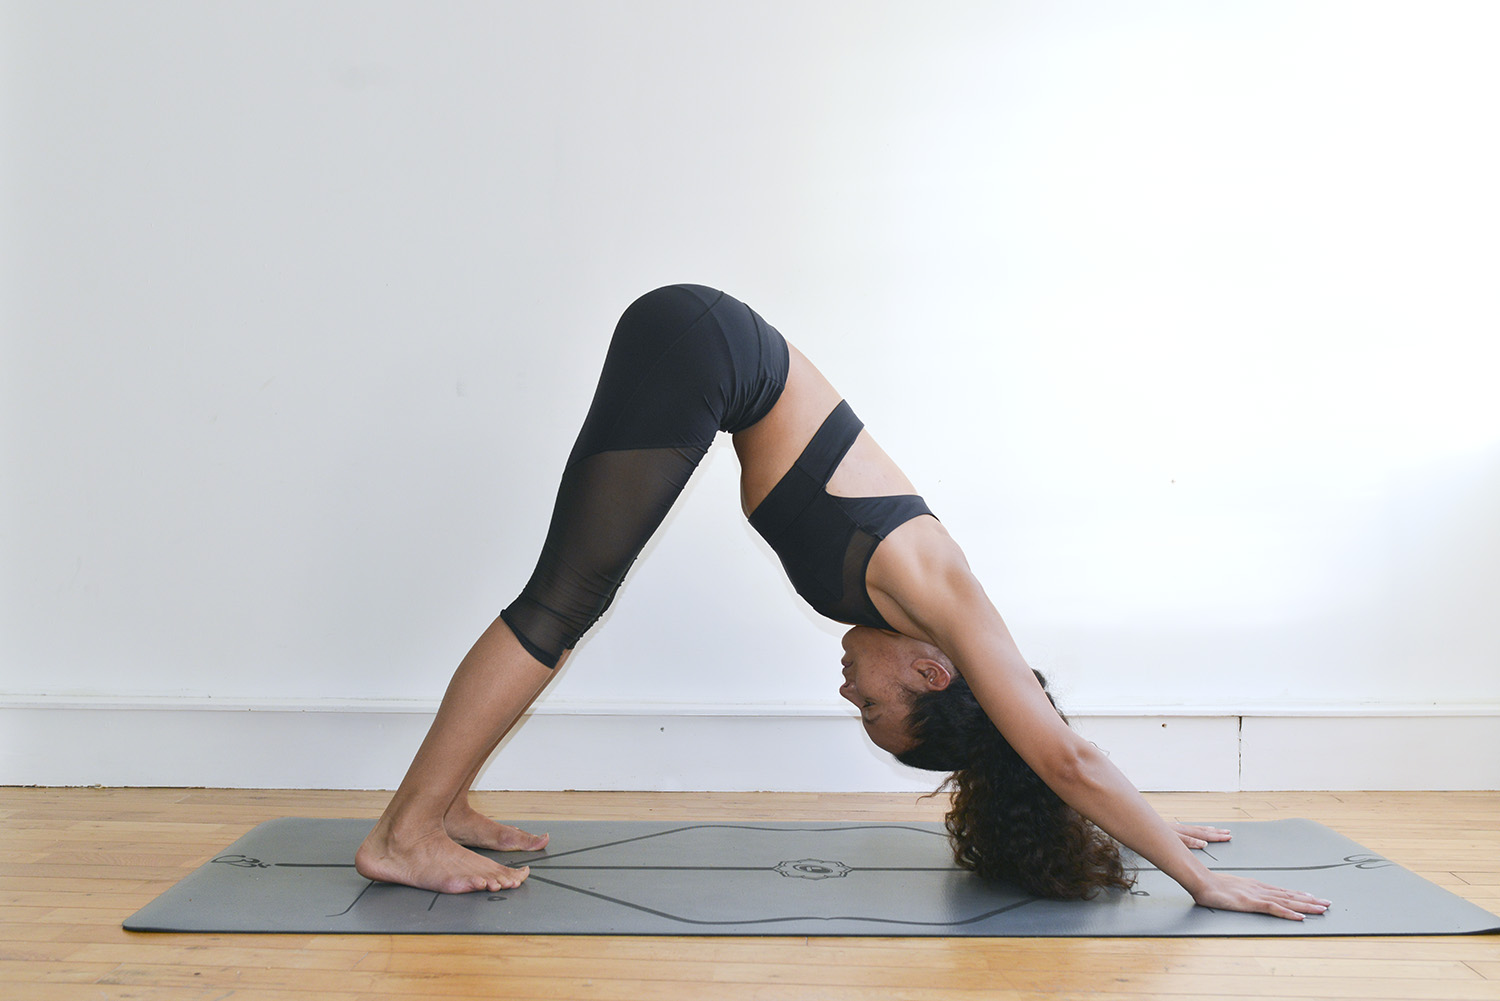
3. Downward Facing Dog
1. The Downward Facing Dog is a terrific yoga position to strengthen your core and improve your posture by strengthening the abdominal muscles.
2. Begin by sitting in a tabletop position with your hands and knees to perform Downward Facing Dog. Move your hips in a slow, steady motion with your legs and arms straight. It’s best to create the upside-down “V” with your body. Keep this posture for 30 to 1 min.
3. Downward Facing Dog is a great beginner posture that can be altered to make it more comfortable or more challenging, based on your fitness level. It is possible to keep your knees bent to keep the pose more comfortable, and you can increase the difficulty by elevating only one leg at a time.
4. This yoga posture is useful for tension and stress relief if you’re feeling anxious; try performing Downward Facing Dog for a short time each day.
Benefits
- Boosts energy2. Helps ease back pain.
- Improves circulation
- Strengthens the immune system.
- strengthening the upper part of the body.
- Increases the flexibility of the hamstrings.
How To Practice
- Simply sit on all fours and sit on the knees and hands in various positions.
- The toes are then rolled over to allow them to sit on your heels.
- Maintain your hands down while you push your hips upwards with your feet straight, then press your heels back to the mat, forming an upside-down V shape.
4. Half Boat Pose
Half boat poses are an excellent yoga position for strengthening your core. The pose helps improve your balance and tone abdominal muscles. Place your feet on the ground with your knees bent and your feet on the floor for this posture.
Lean slightly back while placing your hands on top of your head. Then lift them off of the floor with your feet in a straight line with the floor. In between 30 and one minutes, remain there for a while.
Benefits
- Strengthens the Abdominal Muscles
- Improves the Functioning of Liver and Kidneys
- De-stresses the Body and Mind
- Rectifies the Back Problems
- Promotes Healthy Weight Loss
- Enhances Blood Circulation
- Treats Navel Displacement
- Balances Hormonal System.
How To Practice
1. You can lay on your yoga mat with your knees bent and your feet as close to your hips.
2. Your hands should be approximately two inches away from your rear body.
3. Lengthen your body by extending your body from your neck into your hips.
4. Lean a little forward, and inhaling, lift your feet off the mat.
5. Legs should be stretched gently to the front keeping the shins parallel to the floor.
6. Lengthen the arms towards the side of the legs.
7. To release yourself from the position, Bend your knees, then put your feet on the floor.
5. Plank Pose
Plank Pose is an excellent exercise for strengthening your core, and it requires you to keep your body straight as it were a block made of wood. This pose encourages you to utilize your core muscles, including your abs, back, and hips.
Begin by putting your hands in a push-up position to do a Plank Pose. With your hands to each other, drop your arms towards the ground. Keep the position for 30-60 seconds to keep your core engaged while keeping your shoulders straight.
Different variations that are a part of Plank Pose can be tried if you want to take on a new challenging exercise. For instance, lifting your leg from the floor or putting your forearms on the surface that is raised, and these variations can assist you in engaging your core muscles further.
Benefits
- It aids in strengthening your core.
- Increases the definition of muscles.
- Increases Metabolism
- It assists in relieving back discomfort.
- Improves your posture
- Enhances balance
- It can improve the condition of your bones and joints.
- It Improves Mood and Reduces Stress
How to Put It Into Practice
- Begin by playing Tabletop.
- The sternum should be extended away from the navel and open over your chest, and then to the position of a Cow tilt when you exhale.
- Inhale and do a little Cat tilts to tone the lower abdomen while avoiding any indication of an upward bend on the back. Keep this in your mind.
- Retract your feet and straighten your legs if you remember this set of tilts of the Cat and the Cow.
- To create a slight tilt to the posterior of the pelvis to help it become smaller in the center, Lift your thighs’ tops to the ceiling while lowering your tailbone until it is level with the floor.
- Your lower tummy should be able to support your lower back, similar to the back of a tray.
- When you stretch your sternum forward and press your heels back, keep your strength in the middle of your abdomen.
- In the end, you’ll be able to keep your focus for one minute at one time.

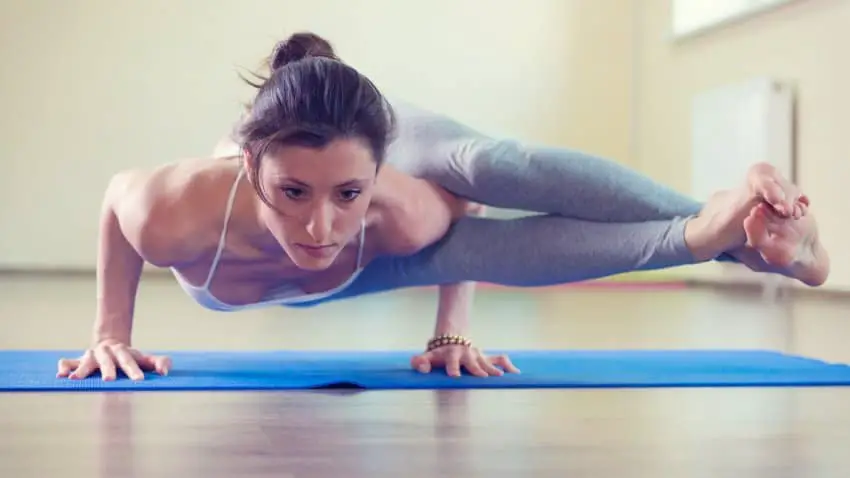
6. Forearm to Knee Pose
The forearm-to-knee pose is an excellent method to build your core strength. This posture requires you to place your forearms on the ground and then lift your knees towards your chest. After that, you can push your knees towards your arms and remain in the position for about a minute. This exercise helps strengthen your shoulders, back, and arm muscles.
This posture is also excellent for improving your balance. Try lifting an arm off of the ground as you’re in the forearm knee position, enhancing your control and balance.
This is also a good pose for stretching your hips and back muscles. Try raising one knee towards your chest while keeping the opposite leg straight. It is also possible to extend your arms upwards while in this posture.
Benefits
- This posture improves the core strength and balance.
- Stretch and build your gluteus maximus muscles and quadriceps, hamstrings, calves, biceps, triceps, and core muscles.
- Stability and balance challenges strengthen the core muscles.
- This posture can help you increase your awareness of your body and posture.
- It also offers a solid base for yoga poses that require balance and stability.
How do you practice
- Get on all fours with your wrists under the shoulders and knees beneath the hips.
- Bring your right foot up to the rear of your mat. Flex your foot.
- Your right leg is lifted to hip height while keeping your hips straight toward the floor and flexing your feet.
- Lift your left arm to shoulder height while keeping your arm straight. Then, point your thumb towards the ceiling as if you were about to shake hands with someone or move your palm toward the floor.
- Keep your left knee in balance and the right hand, ensuring your spine is level and your neck straight. Your gaze should be focused on the floor.
- Take five to ten breaths before lowering the hands and knees. Do a few breaths on all fours to establish your foundation back on solid ground, and then repeat the position on the opposite side.
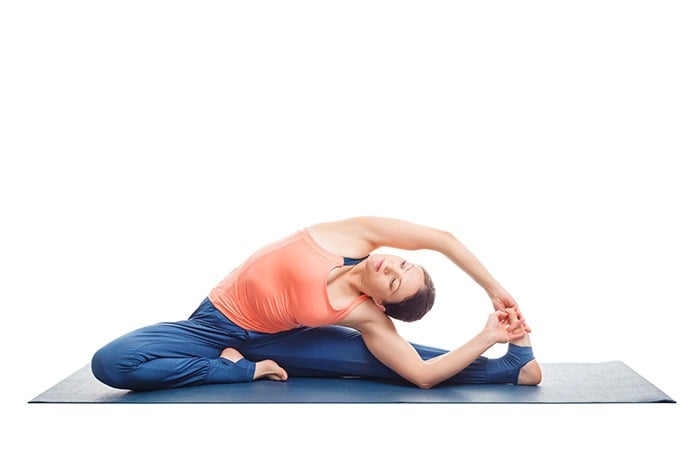
7. Seated Forward Bend
A seated Forward Bend is a great Yoga routine for strengthening the core. This pose increases hip and spine flexibility and also strengthens abdominal muscles.
Place your feet on the floor with your legs straight to start this posture. Bring your hips up and reach your toes. You can place both hands on the floor or on your ankles, whichever feels more comfortable. Maintain this posture for a few minutes before returning to your seat in a seated position.
This posture can be difficult initially; however, it gets easier as you get more practice. If you find reaching your toes hard for you, utilize a yoga strap or towel to aid you. Put the towel or rope over your feet and then hold on to the ends while bent toward the front.
Benefits
- The hamstrings are stretched at the rear of the legs
- It lengthens and stretches the entire spine
- Massages internal organs, particularly the digestive organs.
- Reduces digestive problems like constipation
- Helps with sciatica problems.
- Rejuvenates the nervous system
How do you practice
- Take your arms straight towards the sides, and then raise them above your head. Aiming towards the ceiling.
- Inhale deeply and pull your spine in a long.
- After exhaling, you will begin to move forward, bending towards your pelvis. Think of your pelvis as the shape of a bowl filled with water tipped upwards.
- With each breath, you should stretch your spine with each inhale. To accomplish this, it is possible to come a little away from your forward bend.
- Each exhale, you will deepen into your forward bend. Imagine your belly resting on your thighs, not the nose moving towards your knees. This will help maintain your spine’s length.
- Maintain your neck as your naturally extending part of the spine. Avoid turning it up to gaze upwards, nor relaxing it completely.
- If you are at your full extension and your spine extended, you must decide if you’d like to remain here instead of letting your back turn to the side.
- Hold your ankles or shins, depending on what you can reach. It is also possible to put the strap that you put on to secure your feet. Make sure your feet are flexed throughout.

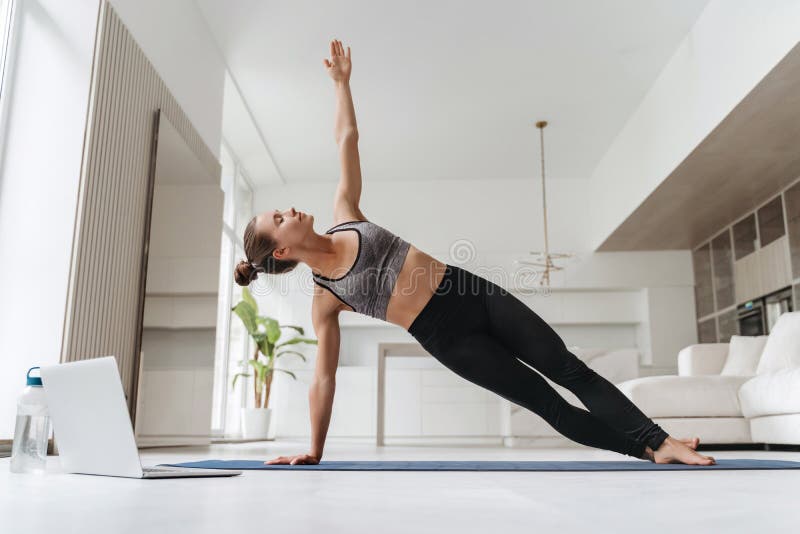
8. Side Plank
The side plank is a great yoga exercise for strengthening your core. Start by lying on your back on a mat for this side plank. Next, lift your hips and lift yourself with your elbow until your body forms an even line between your shoulder and your feet. Maintain that position for 30 secs before dropping back down to the mat. Rep with the opposite side.
Side planks are an excellent exercise to build your obliques, the muscles that run through your abdomen’s sides. It also helps improve the tone of your shoulders, arms, and legs. The side plank can be difficult; however, it’s worthwhile!
Benefits
- It strengthens three muscle groups simultaneously.
- It protects your spine.
- Your core is strengthened without straining your back.
- Reduces the chance of back injury.
- Improves your balance.
- Reduces the risk of back injury
How To Practice
- You should lie on your right side with your legs extended and stacking from the hips to your feet. Your right elbow lies directly below your shoulder. Be sure that your head is aligned with the spine. Your left arm should be aligned on the right side.
- Involve your abdominal muscles, pulling your navel towards your spine.
- Then lift your knees and hips from the mat, exhaling. Your torso is straight, without bent or sagging. Maintain the posture.
- After a few breaths, exhale and then return to your starting position. The aim should be to remain for 60 minutes. Reverse the sides, and then repeat.

9. Standing Side Plank
The Standing Side Plank is an excellent yoga posture that will strengthen the core of your body. Begin by standing tall and with your legs separated by a hip-width to begin the carriage. After that, raise your right hand and place the hand on top of your hip. Then, lift your left hand, and place it on your right shoulder. Inhale and turn your back to the left, then bring your left elbow to join with your left hand. Maintain this position for a few minutes before returning to the starting position. Repeat the same exercise on the opposite side.
This pose is excellent for strengthening the core muscles like the obliques transverse abdominis. It also assists in the development of stability and balance. If you suffer from wrist or shoulder discomfort, change the position using your arms on the hips rather than your shoulders.
Benefits
- It strengthens three muscle groups at the same time. …
- Your spine is protected. …
- Your core is strengthened without straining your back. …
- Improves your balance. …
- Reduces your chance of suffering a back injury.
How To Practice
- Place your body on your right side while keeping your knees straight and feet placed on top of one another. Put your right elbow underneath your right shoulder. Keep your forearm facing away from you. Keep your hands rolled up into the shape of a fist. The pinky hand should be touching the ground.
- While your neck is neutral, breathe in and strengthen your core.
- Lift your hips from the mat to ensure that you’re able to support your weight on your elbow and the right side of your foot. You should have your body straight between your ankles and your head.
- Keep that position throughout the entire duration of the workout. Based on your fitness level, you should aim for 15 and 60 minutes.
- Repeat on your left side.
10. Bridge Pose
The bridge posture is a fantastic yoga posture to build core strength.
This posture helps strengthen the muscles in your back and lower abs and glutes. It also assists in improving your posture and improve flexibility. If you are suffering from low back discomfort, this position will also aid in relieving it.
Benefits of Bridge Pose
- Strengthens glutes, back leg, and ankles
- Heart, chest, and Hip Flexors
- The chest, neck, shoulders, and back
- The body is calm, relieving depression and Stress.
- Stimulates the abdominal organs and the thyroid, lungs, and stomach.
- Restores tired legs
- Improves digestion
How To Practice
- Lay on your back while keeping your knees bent. Feet flat on the floor. Spread your arms across the floor, with your palms straight.
- Put your arms and feet on the floor. Breathe as you raise your hips towards the ceiling.
- Bring your tailbone towards your pubic bone. Hold your buttocks up off the floor. Avoid squeezing your glutes or bending your buttocks.
- Your shoulders should be rolled back beneath your body. Take your hands off and stretch your arms across the floor below your pelvis. Make sure to straighten the arms as far as possible while pressing your forearms against the mat. Bring your knuckles towards your heels.
- Keep your feet and thighs parallel. Do not roll toward the sides of your feet or allow your knees to fall together. Apply your weight evenly across the four sides of your feet. Your tailbone should be extended towards the rear of the knees.
- You can hold it for as long as one minute. Let go, loosen your hands, then place them down, palms facing your body. Inhale while slowly rolling your spine across the floor in various vertebras by vertebras. Your knees should fall together.

11. Cat/Cow Pose
The Cat/Cow pose is fantastic for strengthening your core, and the pose can stretch your neck and back and strengthen the abdominal muscles.
Begin by placing your hands on your knees while keeping the spine in a neutral place to do the Cat/Cow posture. Bend your back while raising your head towards the ceiling when you breathe in. Exhale by rounding your back and then placing your chin on your chest. After a few minutes, repeat the sequence.
The pose is also excellent for easing tension and Stress. If you’re feeling anxious or stressed, try this pose for a couple of minutes, and you’ll feel your muscles relax and your thoughts free.
Benefits of Cat-Cow
- Improves balance and posture
- It strengthens and extends the spine and neck
- The abdominal muscles, the hips, and the back
- Coordination is improved
- The massage and stimulation of organs within the belly, including the adrenal glands and kidneys
- Balances the emotional
- Relaxes and relieves Stress. Mind.
How To Practice
- Begin by placing your hands and knees in a table pose with an upright spine. When you breathe in and shift to cow pose, lift your sit bones to the side, press your chest to the side and let your belly sink.
- Relax your head, lift your shoulders, take your eyes off your ears and look at the sky.
- After exhaling, get into the cat-like pose while extending your spine to the side, pulling in your tailbone; the pubic bone is pulled forward.
- Let your head fall towards the floor, but do not force your chin into your chest. The most important thing is to let your body relax.

12. Happy Baby Pose
It is known as the Happy Baby Pose is a great exercise for strengthening your core. Relax on your back, and lift your knees towards your chest to do this posture.
With your hands resting on both feet outside, pull your legs upwards towards your armpits. Your hips and lower back should be feeling stretched. Do this for 30 to one minute.
Benefit
- Releases the lower back and sacrum
- The hips are opened, the inside thighs and the groin
- It stretches the hamstrings
- Lower back pain is relieved
- Relaxes and soothes the spine
- The brain is calmed
- It helps relieve fatigue and Stress.
How to Practice
- Start lying on your back
- The legs should be dragged up to the chest
- Place your arms between your knees and keep your feet to the outside.
- Lift the soles of your feet towards the sky, and draw the knees towards the shoulders.
- Gently rock between sides.
13. High Lunge
It is a great opportunity to work your core muscles to remain standing straight when in this posture. Concentrate on pulling your navel while bringing your ribs together to activate your external and internal Obliques and your rectus abdominus.
Benefit
- It opens your hips and groins.
- It helps stretch and tone your legs, particularly the thighs.
- It strengthens your ankles, knees, and waist.
- Enhances the abdominal organs.
- Improves lung endurance and stamina.
- The spine is stretched, thus stretching the chest.
- The treatment is for constipation, indigestion Sciatica, and constipation.
How to Practice
1. Return to Downward Facing Dog and rest for five minutes.
2. Move your right foot forward with your right hand.
3. Then bend your left knee, then place it with your left ankle to have your left thigh in line with the floor.
4. Lift both arms towards the ceiling before settling into the High Lunge.
Keep breathing for five minutes. (Don’t be concerned, as we’ll be on the opposite side in one minute.
14. Boat Pose
An excellent exercise for the transversus abdominis strengthening the abdominal organs while you keep your balance. The navel should be pulled back and upwards and lifted to the sternum.
Benefits
- Tone and strengthen abdominal muscles.
- Improves digestion and balance.
- Stretches your hamstrings
- Improves the strength of your spine and hip and flexors
- The stimulation of the prostate and thyroid glands and the intestines
- Helps to relieve Stress
- Increases confidence
How To Practice
1. You can sit down on your mat.
2. Straighten the legs at a 45-degree angle, moving into Boat Pose. The torso naturally falls back, but you should not let your spine contract.
3. Create a “V” shape with the body.
4. Straighten your arms to align with your shoulders.
15. Eagle Pose
An excellent pose to strengthen balance and the deeper core muscles like the internal obliques and those of the abdominal muscles transverse. Make your ribs knit as if you were creating an obelisk, and draw your navel back and up.
Benefits
- Balances the body.
- The calves are strengthened.
- It helps to reduce sciatica and rheumatism.
- The hips and legs are loosening, which makes them more elastic.
How To Practice
- Start in Awkward The Chair Pose (Utkatasana) with your legs bent with your arms at your sides. Alternately, you can start by standing on your knees with your feet flexed.
- Place your weight on the left side of your foot.
- Lift your right foot from the floor.
- Your right thigh is crossed on your left side, as high to the thigh as is possible.
- Hook your right foot around your left calf.
- Both arms should be out to the side and straight to the floor.
- Relax your arms, and then cross your left arm across the right one, hook between the elbows. When your arms are hooked, pull your forearms towards you, wrap your right hand around your left hand, and cross your wrists. (Whichever leg is placed on top and the opposite hand should be at the top.)
- Then lift your elbows until they reach the top of your shoulders while keeping your shoulders sagging away from your ears.
- Maintain your spine parallel to the floor with the top of your head rising.
- Do this for 5-10 breaths.
- Repeat with the other side.
Conclusion
Above core yoga poses can aid in strengthening your core. The side, plank, and boat postures are the most effective. Try to practice core yoga poses for core strengthening now.