
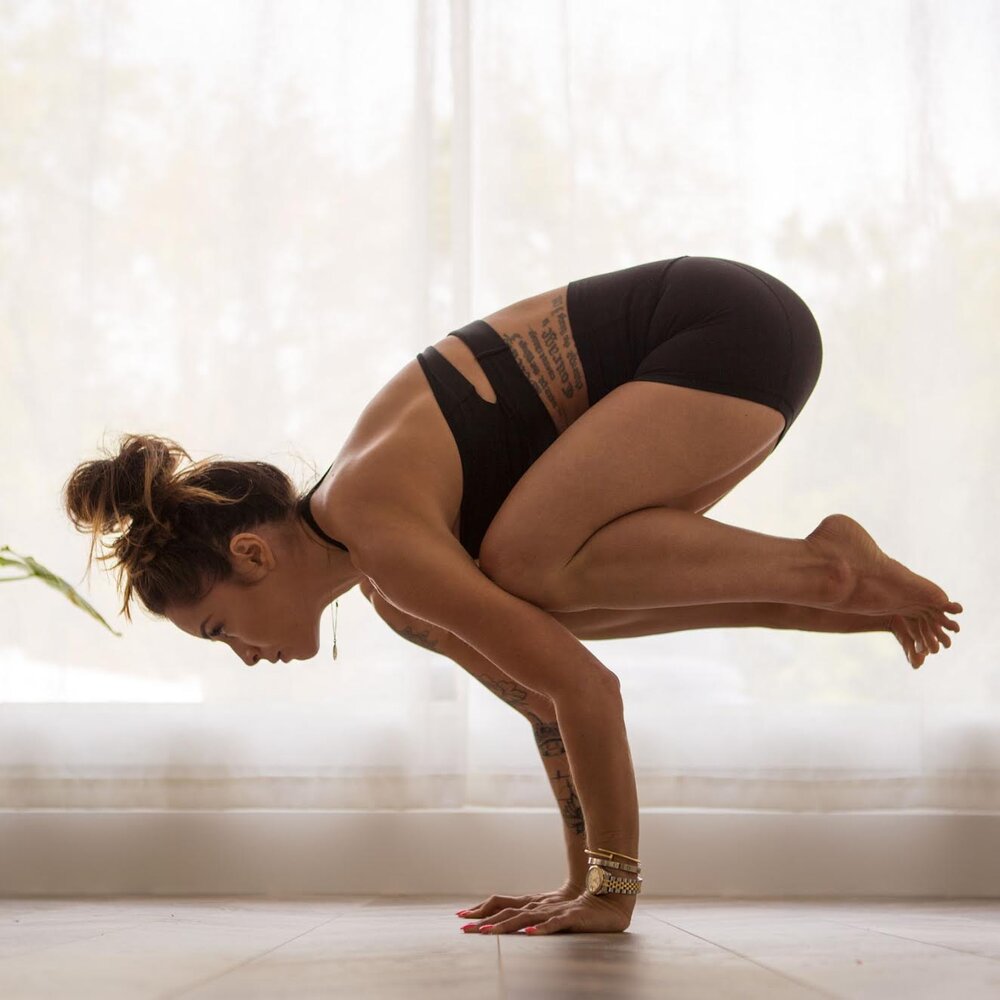
Are you looking for a more challenging exercise? The crow pose is ready for you.
It is usually the first pose that Yogis think of when they want to practice arm balance. You’re literally going to do so by standing on your hands.
In this guide, I am going to walk you through 10 crow pose variations and how to practice each. Without further ado, let’s get right into it!
What’s the Crow Pose?
It is an intermediate-level pose that will teach you how to raise yourself off the ground just like a bird in flight.
Most yogis take the crow pose to be one of the most important poses to learn because it perfectly symbolizes the ideals of yoga — physical, mental, and emotional power.
It tones and extends your arms and buttocks, and boosts your mental health.
If this is your first time doing this, make a “fall zone” — a pillow on the front of your mat where you can land if things go wrong.
The Benefits of Crow Poses
1. It’s a Good Starting Position
The crow pose is a great way to lighten up and set the foundation for many arm balance exercises.
2. It’s Energizing
It takes a lot of effort, both physically and mentally, so you will get that tremendous satisfaction and self-confidence when you finally master the crow pose.
3. It Serves as a Gentle Reminder That Falling Is Perfectly Normal
When things don’t go as planned at work or in our personal lives, we can become frustrated. We forget that falling is an opportunity to climb back up.
Yoga Crow Poses: Warm-up
Wrist
You will use your hands to keep yourself upright all throughout. Your wrists will be under a lot of pressure so it is highly recommended that you do a lot of simple wrists stretches to get you going. It will also help reduce any chance of potential injury.
Your hands should be flat on the mat, in line with your shoulders, and your fingers should be spread wide. This will prevent you from dumping the weight into your wrists.
Make sure to bend your elbows at a 90-degree angle. Many Yogis make this mistake by allowing their elbows to splay outward, which creates a broader base.
They think that doing so will make it easier to get into the crow pose, but it is really the opposite. An improper alignment could also lead to a serious injury.
Your arms will simply form a platform for you to place your body weight on.
Hip
The other thing you can do to warm up your hip flexors and prepare your body is to do the Garland Pose. Ideally, you should hold it for like one minute, but you can always go for more if you feel comfortable. Always listen to your body.
How to Do the Crow Pose? Crow Pose Forms?
Step 1
Squat down on the floor, keeping your feet and knees separated. To lay your fingertips on the floor in front of you, reach your arms between your knees.
Step 2
Lean forward and flatten your palms on the floor. Spread your fingers wide and slightly bend your elbows outward. Tilt your torso forward so your feet’s soles are lifted off the floor.
At this point, your toes are the main source of support as you transition into the complete position. Keep your hands beneath your shoulders and your knees on the back of your upper arms.
Step 3
Shift your weight from your toes to your palms, keeping your toes on the ground to help with balance. Do so just enough to get your head parallel to the floor.
Step 4
Place all of your weight on your hands. Raise your feet one at a time, keeping them relaxed as you do so. With your knees pressing against your upper arms, your shins should be parallel to the floor.
Step 5
Breathe for as long as it feels comfortable and then repeat the steps again.
10 Crow Pose Variations
1. Side crow pose
Introduction
Side Crow Pose, also known as Parsva Bakasana, is a unique pose that helps with flexibility and control.
Sure, it is not an easy one, but it is a great pose to try when you want to practice and perfect arm balance.
Benefits
The twists in this pose will strengthen the chest, shoulders, forearms, and oblique muscles while also nourishing your spinal cells.
How to Practice
Step 1
Take your left elbow to the outside of your right knee in a crouched position with your legs together. After that, place your right elbow on your right hip. You should have an elbow on each end of your thigh at this point.
Step 2
Place your palms on the ground, bend your elbows, and lean forward. When doing so, make sure you are keeping your chest lifted, while your attention point is on the floor.
Step 3
Squeeze your inner thighs together and elevate your legs once you lean forward so that there’s little weight left on your feet.
Step 4
Try it one more time, but now at a slower pace.

Beginner’s Tip
Maintain a forward stare! Always direct your focus point in the direction in which you want your body to move. It will also help to maintain the chest up.
2. Reclined Crow Pose
Introduction
With this pose, you will simply lie down to practice arm balances. How easy! You will be supported by the mat underneath you so gravity is your friend.
Benefits
The reclined crow pose will provide your body with a template to follow. It will stretch your arms and legs in such a way that it will become part of your daily exercises.
How to Practice
Allow the inner arches of your feet to touch firmly as you lay down on your back. Then, lift your head and shoulders off the mat and reach the ceiling with your arms. Now take about 4 or 5 deep breaths before you get back to the original position.

Beginner’s Tip
Make sure you thoroughly press your hand into the floor by spreading your fingers. To feel solid in the balance, you want to maximize the surface area of your hands as much as possible.
3. Seated Crow Pose
Introduction
The seated crow pose is almost like a funky version of the boat pose. You will heavily rely on your hip flexors to hold yourself in this pose. are aware of it since they work hard to hold you in this position.
Benefits
This pose will strengthen your hip flexors, and keep your knees as flexible as possible.
How to Practice
Bring your feet together, arms straight out in front of you, and place your knees somewhere on the outer arms.
Expand your upper chest and shoulders, and squeeze your knee. This will help to engage your inner leg muscles. Take 4 to 5 calm, deep breaths and then repeat the steps again.

Beginner’s Tip
Make sure that the part of your thigh that is in contact with your arm is higher than your elbow and not so close to your knee that it slips off.
4. Baby Crow
Introduction
Baby crow is a sweet variation of the crow pose. It will bring your body closer to the ground as your forearms provide a sturdy foundation especially if you have a long torso.
Benefits
It strengthens your arms, upper back muscles, and spine. It also prevents you from putting too much pressure on your wrists.
How to Practice
Step 1
Lower your forearms onto the mat. Make sure they’re securely placed because this will help your shoulders and upper back engage. Raise your heels and bring your knees behind your upper arms.
Step 2
Now lean forward with your upper body, hugging your triceps and shoulders in. Don’t be scared if it feels like you are about to fall. You can use your arms to stay balanced in place.
Step 3
Round your spine now just like a crow.
Step 4
Allow your toes to lift from the ground. Maintain your eyes on the top border of your mat. Hold this position for a few seconds, then move your weight back and place your feet back on the mat.

Beginner’s Tip
Place a pillow or a pile of blankets in front of you so that you will land on something soft if you fall.
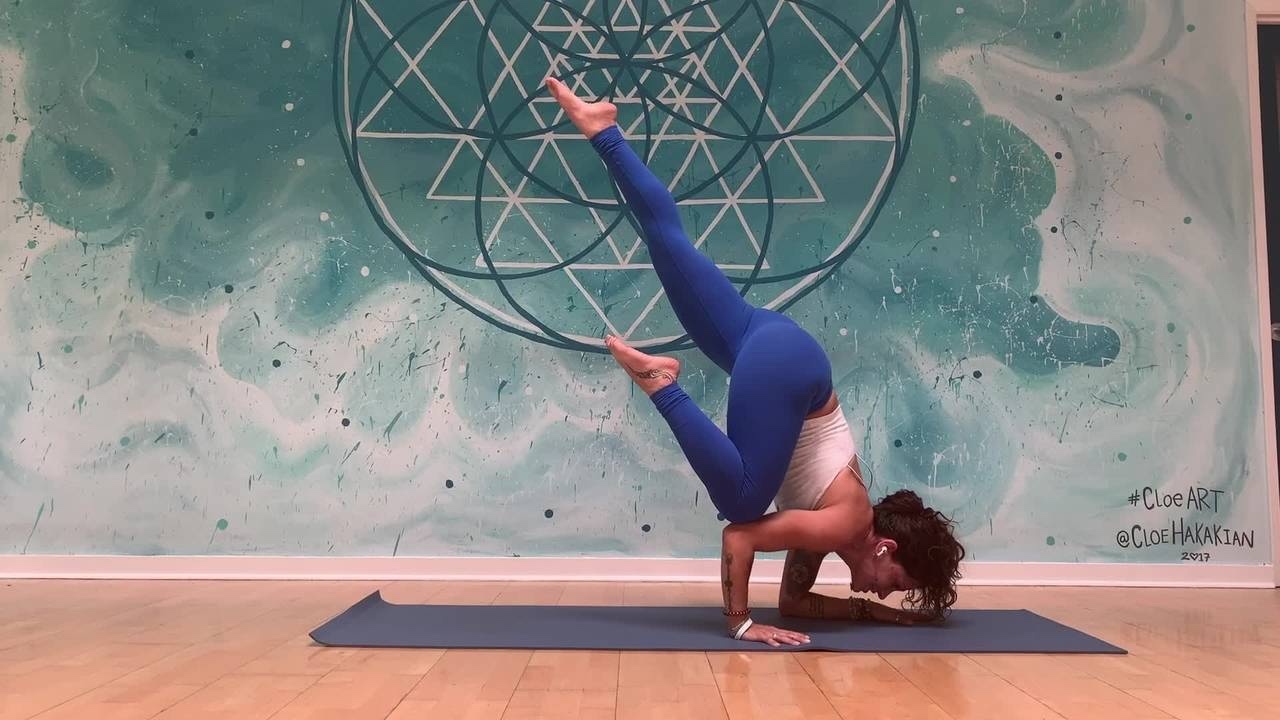
5. Flying Crow Pose
Introduction
With this pose, you will feel the sensation of flying while also improving your overall body balance.
Benefits
It strengthens and stretches your arms, wrists, neck, and shoulders. It will also open your hips.
How to Practice
- Bring your right knee to your right triceps in a three-pointed plank. Your knee should be directly above the elbow.
- Now lean forward and raise your hips, while shifting your weight away from your left toes.
- Engage the left leg and glute as you shift your weight.
- Hold for about 30 seconds.
Beginner’s Tip
Put a block or cushion in front of you just in case you take a big leap forward.

6. Crane Pose
Introduction
The crane pose will take your arm balancing practice to the next level. It will snuggle your knees closer to your underarms. It’s also pretty taxing on the wrists.
Benefits
The crane pose helps with concentration while stretching your buttocks (glutes), back, and wrists. It also strengthens your chest, hip flexors, and hamstrings.
How to Practice
- Spread your fingers wide to ensure a solid base.
- Perch high on your toes and lift your hips.
- Now round your spine and cinch up the lower belly.
- Raise the heels of your feet off the mat and clip them tightly against your buttocks.
- Take a deep breath once you’ve reached lift-off.
- To avoid hyperextension, straighten your arms as much as possible while maintaining a little micro bend in your elbows.
- Stay in this position for a few seconds before you slowly get back to your original position.
Beginner’s Tip
Push your upper arms on your shins and drag your inner groin toward your pelvis to help with the lift when you’re ready to take your feet off the floor.
7. Supine Crow Pose
Introduction
The supine crow pose is the “gateway” arm balance, the ultimate strength-posture, and a wonderful variation of the crow pose.
Benefits
It strengthens your upper body and improves your overall balance.
How to Practice
- Begin by reclining backward and drawing your knees into your chest.
- Stretch your arms up in line with your shoulders.
- Extend your wrists to reach up high with your hands.
- Spread your fingers out wide and equally spaced.
- Spread your knees apart and bring your toes together.
- Bring your knees closer to your arms and slide them as high as your body will comfortably allow near your armpits.
- Squeeze your legs energetically toward your body’s midline.
- Press your upper arms against your inner thighs with the same amount of force.
- Draw your shoulder blades apart and press your hands up toward the ceiling until your shoulders and head lift off the floor.
- Take five deep breaths and then stay in this position for a few seconds.
Beginner’s Tip
Place your forehead on a block in front of you as you lean forward. This will protect your forehead in case you stumble over it.

8. One-legged Crow Pose
Introduction
The one-legged crow pose is a somewhat difficult arm balance exercise that needs strength and coordination. It’s a challenging asana for intermediate to advanced Yogis.
Benefits
It improves balance and attentiveness and stretches your upper back and shoulders.
How to Practice
- Place your right foot just behind your hands.
- Get your shoulder blades down your spine.
- Now place your right knee as high up your right arm as possible.
- Lean forward with your weight and gradually lift your left leg off the floor. You can either hover your left knee towards your chest or start extending your knee to straighten your back.
- Lift your right foot towards your buttocks.
- Now take a deep breath and stay in this position for around 20 seconds.
Beginner’s Tip
Pull your navel back towards your spine to strengthen your core. Also, keep your elbows close to each other, your right foot close to your hips, and your shoulders broad.
9. Flunky Crow Pose
Introduction
The flunky pose is a playful variation of the crow pose. You will use your forearm to support yourself on the mat.
Benefits
It stretches your upper body, strengthens your core, and improves your balance.
How to Practice
- Place your left forearm and right hand on the ground, with your right fingertips aligned with your left elbow.
- Lift your knees off the floor.
- Bring your right knee into your right underarm if you feel stable in your balance. Only keep your left foot on the floor.
- Hold for about 15 seconds and then repeat.
Beginner’s Tip
Make sure you do all the basic stretches before you do the flunky crow pose as this will stimulate your muscles.
10. Shoulder Press Pose
Introduction
It is a challenging intermediate pose that needs a great deal of strength and flexibility.
Benefits
This pose helps to tone your abdominal muscles and strengthens the wrists and arms.
How to Practice
- Start in a low squat with your feet somewhat wider than your shoulder width.
- Place your hands on the floor behind your feet.
- Shift your weight back so that your feet are lifted off the ground.
- Squeeze your arms and legs together.
- Once you’ve reached a state of balance, work on straightening your arms.
- Take calm, deep breaths while balancing in the pose.
- Exhale as you bend your elbows and lower your feet to the floor.
Beginner’s Tip
Make sure to flex your upper body and hips before you do this pose.
/1-ee08f17534ce473fa69bb53a07019281.jpg)
Tips for Beginners to Do Yoga Crow Poses
1. Place some pillows or padding on the floor in front of you and try to practice on them before you do the crow pose.
2. Lift one foot at a time or set your feet on a yoga block to get a sense of how different variations of the crow pose in yoga feel with a little more support.
3. Draw your elbows and inner thighs in, and make sure your elbows are directly above your wrists.
4. Maintain your focus point on the floor to keep your neck in line with the rest of your spine.
Crow Pose FAQs
Can everyone do the crow pose?
Yes, as long as they have the strength, flexibility, and focus, needed.
Is Crow a hard pose?
No, if you are an avid Yogi. In fact, many Yogis consider the crow pose as a great warm-up exercise for more challenging and difficult poses.
Summary
At the end of the day, Yoga is all about finding a moment of stillness. A moment when the mind, body, and spirit are all working together in harmony. Rest assured, the crow pose allows you to achieve that.
I hope that you enjoyed these 10 variations of the crow pose. Remember that you can always do some warm-up poses to help you build the strengths to master any of the crow poses listed above.
Above all, don’t be afraid to fall and don’t get caught up in “perfecting any pose.”
Did you ever find yourself in a similar position and it just kept trying and trying? Or perhaps you know of a more interesting crow pose that was not listed above? Feel free to let us know in the comment section below!